Installing MOTECH for Developers (“Official” Method)
Table of Contents
Installing on Ubuntu
The versions below may change, most likely the latest stable release will work for your purposes. We upgraded from Java 7 to Java 8 in MOTECH version 0.28. The instructions are annotated with this change. If you have any trouble, please feel free to send feedback to our developer list.
- Install Ubuntu Desktop 14.04 LTS 64bit
Install Maven, Git, Curl, ActiveMQ, NodeJS, NPM, Bower, Gulp and a database of your choice
In terminal, type
sudo apt-get install curl git maven activemq npm
curl -sL https://deb.nodesource.com/setup_4.x | sudo -E bash -
sudo apt-get install -y nodejs
sudo npm install -g bower gulp
The two datastores officially supported by MOTECH are MySQL and PostgreSQL. It is not required to install both of them to run MOTECH, but provided you intend to introduce some changes to the code, it may be required that you test the outcome on both databases.
sudo apt-get install mysql-server
sudo apt-get install postgresql
On a fresh Ubuntu installation, you may need to run the following first
sudo apt-get update
Configure ActiveMQ
Run the following
sudo ln -s /etc/activemq/instances-available/main /etc/activemq/instances-enabled/main
Note
For ActiveMQ scheduled delivery to work, you must set the attribute: schedulerSupport=”true” for the broker element in your activemq.xml config file. This file should be located at (active-mq-folder)/conf/activemq.xml.See ActiveMQ docs.
Install JDK 8 (For Developing MOTECH v.0.28 and greater)
Go to The Java JDK Download Page
Accept License Agreement
Click on jdk-8u73-linux-x64.tar.gz (or latest stable version)
Extract the file into your home directory, ie:
/home/*<user>*/jdk1.8.0_73Set the proper Java environment and change maven options:
Start a new terminal session
Edit your .profile file
nano ~/.profile
append the following at the end of the file:
export PATH="$HOME/jdk1.8.0_73/bin:$PATH"
export JAVA_HOME=$HOME/jdk1.8.0_73
export MAVEN_OPTS="-Xmx512m -XX:MaxPermSize=128m"
export CATALINA_OPTS="-Xms1024m -Xmx2048m -XX:MaxPermSize=1024m"
Save the changes (Ctrl+X) and quit
Confirm the settings are right
Log out & log back in & start a new terminal
Type
java -version && env | grep "\(MAVEN_OPTS\|CATALINA_OPTS\)"
You should see something like:
java version "1.8.0_73"
Java(TM) SE Runtime Environment (build 1.8.0_73-b02)
Java HotSpot(TM) 64-Bit Server VM (build 25.73-b02, mixed mode)
MAVEN_OPTS=-Xmx512m -XX:MaxPermSize=128m
CATALINA_OPTS=-Xms1024m -Xmx2048m -XX:MaxPermSize=1024m
Install Tomcat7
Go to Tomcat’s download page
Under 7.0.68 (or the latest stable version) - Binary Distributions - Core, click on tar.gz
Once downloaded, expand the file to your home directory, i.e.:
/home/*<user>*/apache-tomcat-7.0.68Edit the
tomcat-users.xmlfile (located under\etc\tomcat7\conf\) to add an admin user:In the terminal type
nano ~/apache-tomcat-7.0.68/conf/tomcat-users.xml
Insert a line similar to the following before the closing </tomcat-users> tag:
<user username="*<username>*" password="*<password>*" roles="manager-gui"/>
Save the changes (Ctrl+X) then quit
Edit the web.xml of the manager application(located under
\webapps\manager\WEB-INF\web.xml):nano ~/apache-tomcat-7.0.68/webapps/manager/WEB-INF/web.xml
Edit the lines in multipart-config defining the max upload value. Change it from 50MB to a bit more, 100MB should suffice:
<!-- Before changes -->

<multipart-config>
  <!-- 50MB max -->
  <max-file-size>52428800</max-file-size>
  <max-request-size>52428800</max-request-size>
  <file-size-threshold>0</file-size-threshold>
</multipart-config>
<!-- After changes -->

<multipart-config>
  <!-- 100MB max -->
  <max-file-size>100000000</max-file-size>
  <max-request-size>100000000</max-request-size>
  <file-size-threshold>0</file-size-threshold>
</multipart-config>
Save the changes by hitting
Ctrl+Xthen quitNow edit
~/.bashrcto setup tomcat’s environment variablenano ~/.bashrc
Append the following line:
export CATALINA_HOME=$HOME/apache-tomcat-7.0.68
Save the changes (Ctrl+X) then quit
Start a new terminal session or type
source ~/.bashrc
Setup MySQL (skip if you did not install MySQL server)
Access your database, by typing in the terminal:
$ mysql -u root -pCreate required databases (note: when you’re using account with privilages for DB connection, MOTECH will create necessary DBs and fill them with data; otherwise you have to create them yourself)
sql> create database motechquartz;
sql> create database motechschema;
sql> create database motechdata;
sql> exit;
(Optional) Create user for the motechquartz database. MOTECH will use the user and password from the bootstrap configuration by default, but you can adjust that in the Scheduler settings and provide different credentials.
sql> create user 'quartz'@'localhost' identified by 'quartz2123';
sql> grant all privileges on motechquartz.* to 'quartz'@'localhost';
Note
Sometimes it is needed to set the proper database character encoding. For example, to create motechdata database and motechschema database with UTF-8 character encoding, change your sql query to:
sql> create database motechdata default character set utf8 collate utf8_general_ci;
sql> create database motechschema default character set utf8 collate utf8_general_ci;
Setup PostgreSQL (skip if you did not install PostgreSQL server)
Access your database, by typing in the terminal:
$ sudo -u postgres psql postgresSet a password for the “postgres” database role
postgres=# \password postgres
and give your password when prompted.
Create required databases (note: when you’re using account with privilages for DB connection, MOTECH will create necessary DBs and fill them with data; otherwise you have to create them yourself)
postgres=# create database motechquartz;
postgres=# create database motechschema;
postgres=# create database motechdata;
postgres=# (ctrl + D)
(Optional) Create user for the motechquartz database. MOTECH will use the user and password from the bootstrap configuration by default, but you can adjust that in the Scheduler settings and provide different credentials.
postgres=# create user quartz with password 'quartz2123';
postgres=# grant all privileges on database motechquartz to quartz;
Note
MD5 authentication is required and should be enabled by default in latest versions of PostgreSQL. If it’s not the case, you might need to enable this by hand. For more information refer to: http://www.postgresql.org/docs/9.3/static/auth-methods.html
- Start Tomcat
In terminal, type:
~/apache-tomcat-7.0.68/bin/catalina.sh jpda start
You should see messages similar to:
Using CATALINA_BASE:   /home/*<user>*/apache-tomcat-7.0.68
Using CATALINA_HOME:   /home/*<user>*/apache-tomcat-7.0.68
Using CATALINA_TMPDIR: /home/*<user>*/apache-tomcat-7.0.68/temp
Using JRE_HOME:        /home/*<user>*/jdk1.8.0_73
Using CLASSPATH:       /home/*<user>*/apache-tomcat-7.0.68/bin/bootstrap.jar:/home/*<user>*/...
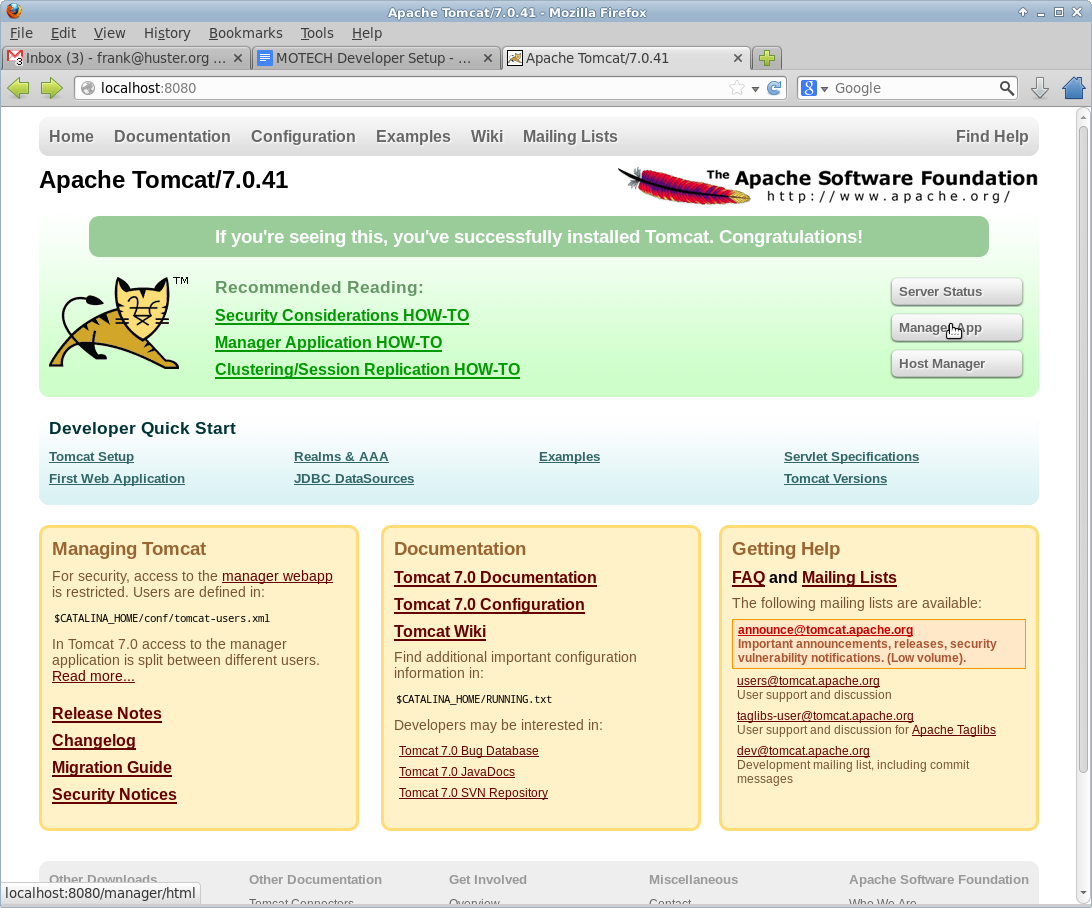
You can also confirm tomcat was started by going to http://localhost:8080 in a browser
Jump to the Building and Installing MOTECH section to install MOTECH
Installing on a Macintosh
Installing Prerequisites for MOTECH
Installing HomeBrew
To install Homebrew, run the following in the terminal
ruby -e "$(curl -fsSL https://raw.githubusercontent.com/Homebrew/install/master/install)"
- Use Homebrew to install git, erlang, ActiveMQ, NodeJS and Apache Tomcat:
brew install git
brew install activemq
brew install tomcat
brew install maven
brew install node
Homebrew installations are located
in /usr/local/Cellar` with symlinks in ``/usr/local/bin, which should already be part of your $PATH environment variable.Note
Homebrew provides instructions about how to run these applications, as well as how to have launchd start them automatically on system startup.
Use NPM (installed with NodeJS) to install Bower and Gulp.
npm install -g bower gulp
Configuring Tomcat
Edit the
tomcat-users.xmlfile to add an admin user. Insert a line similar to the following before the closing</tomcat-users>tag:<user username="motech" password="motech" roles="manager-gui"/>
Edit the web.xml of the manager application(located under
\webapps\manager\WEB-INF\web.xml) and change the lines in multipart-config defining the max upload value. Change it from 50MB to a bit more, 70MB should suffice:<!-- Before changes --> <multipart-config> <!-- 50MB max --> <max-file-size>52428800</max-file-size> <max-request-size>52428800</max-request-size> <file-size-threshold>0</file-size-threshold> </multipart-config>
<!-- After changes -->

<multipart-config>
  <!-- 70MB max -->
  <max-file-size>71680000</max-file-size>
  <max-request-size>71680000</max-request-size>
  <file-size-threshold>0</file-size-threshold>
</multipart-config>
Installing JDK 8:
Mac OS includes JDK6 by default, however JDK 8 is required for MOTECH. Use these instructions to install the latest version of the JDK or these instructions to install JDK 7 for development on MOTECH v.0.27 and prior.
Installing MySQL:
Before installing MySQL, you will need Xcode from the App Store. This can take a while; it’s a big download.
Next start Xcode from the Launchpad (rocketship icon in the dock) and select Install. Then you can quit Xcode; you don’t need to keep it running.
Note
(Command Line Tools using Xcode are included in OS X Mavericks, but not previous OS versions. If you are running Mountain Lion, you can follow these instructions:)
Go to http://dev.mysql.com/downloads/mysql/ and download the appropriate DMG archive. Open it, double-click on the installer, and follow directions.
d. Once mysql has finished installing, double-click the MySQL preferences pane in the DMG and follow instructions. For more details see these instructions .
Note
Homebrew can be used to install MySQL, however Homebrew will not install the Mysql System Preferences control panel.
Setting up Symbolic Link and Environment Variables
Create a symbolic link from the Tomcat directory (Homebrew installs into
/usr/local/Cellar/tomcat/<version number>/libexec) to/usr/local/tomcat:ln -s /usr/local/Cellar/tomcat/`brew info tomcat | grep stable | awk '{print $3}' | sed 's/,//'`/libexec /usr/local/tomcatEdit your
~/.bash_profileto set environment variables (catalina is Tomcat):export JAVA_HOME="/Library/Java/Home" export MAVEN_OPTS="-Xmx512m -XX:MaxPermSize=128m" export CATALINA_HOME="/usr/local/tomcat" export CATALINA_OPTS="-Xms1024m -Xmx2048m -XX:MaxPermSize=1024m" export PATH=/usr/local/mysql/bin:$PATH
- When you’re done editing:
source ~/.bash_profile
Jump to the Building and Installing MOTECH section to install MOTECH
Building and Installing MOTECH
Getting the MOTECH code
Building MOTECH
Assuming you issued the git clone command in your home directory root, in the terminal
$ cd ~/motech
$ mvn install
b.) It takes some time to build MOTECH, but eventually you should see:
[INFO] ------------------------------------------------------------------------
[INFO] BUILD SUCCESS
[INFO] ------------------------------------------------------------------------
[INFO] Total time: 29:19.284s
[INFO] Finished at: Fri Jun 07 12:12:43 PDT 2013
[INFO] Final Memory: 152M/378M
[INFO] ------------------------------------------------------------------------
Note
Should you get a java.lang.OutOfMemoryError exception, it may be because you forgot to set MAVEN_OPT as described in [3.5]. But you may need to increase -Xmx. So something like -Xmx1024m might work.
Install MOTECH
In a browser, go to http://localhost:8080
Click on Manager App
Type the user/password you used in tomcat-users.xml (if you installed via docker the default username/password is motech/s3cret).
temporary hack you need to remove ~/.motech/config/motech-settings.conf to allow the create initial user wizard.
In the Tomcat Web Application Manager, scroll down to the Deploy section and the WAR file to deploy subsection, click on Browse and select or navigate to
~/motech/platform/server/target/motech-platform-server.warthen click on Deploy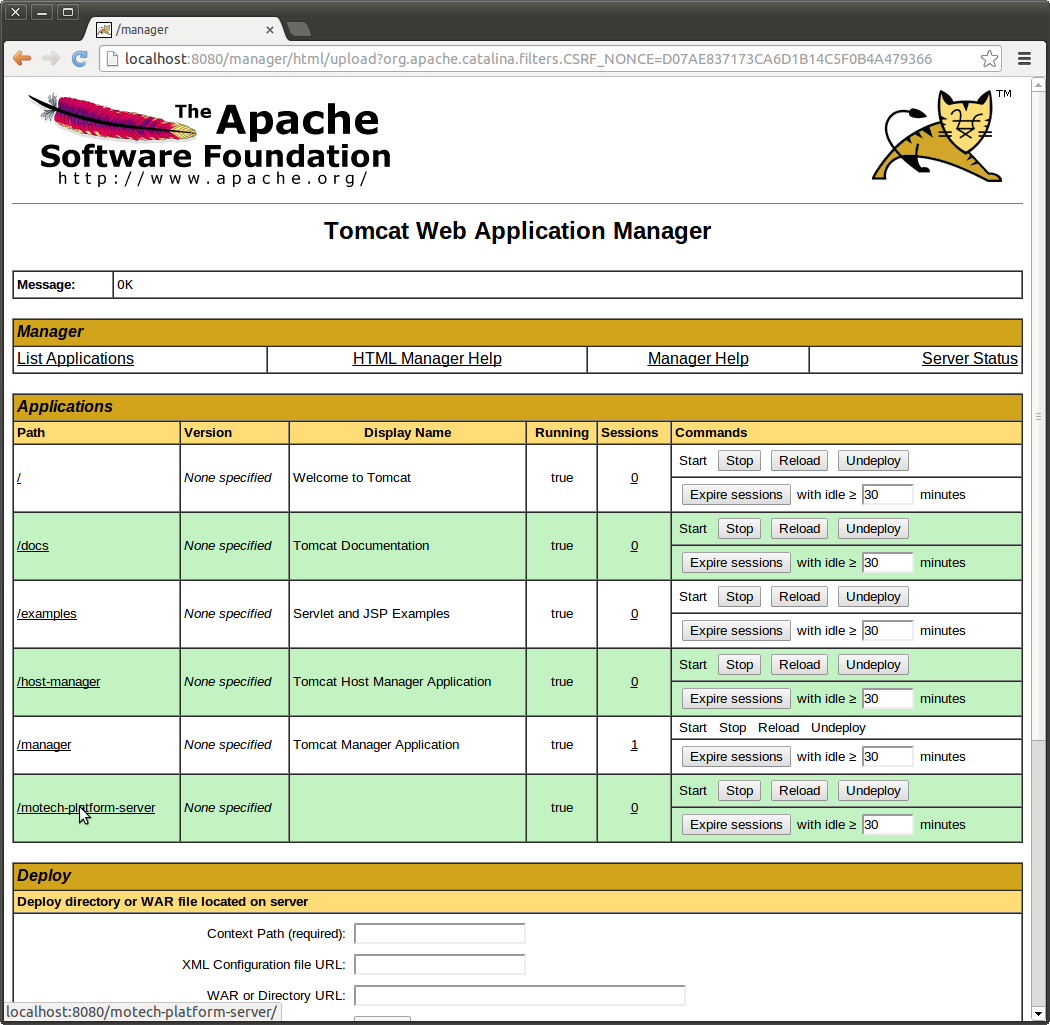
Depending on your machine it could take a while for motech-platform-server to deploy
If you get an error of the form: “the request was rejected because its size (68032892) exceeds the configured maximum (52428800)” follow these instructions to
In the Tomcat Web Application Manager page, click on
/motech-platform-server, you get the MOTECH initial user screen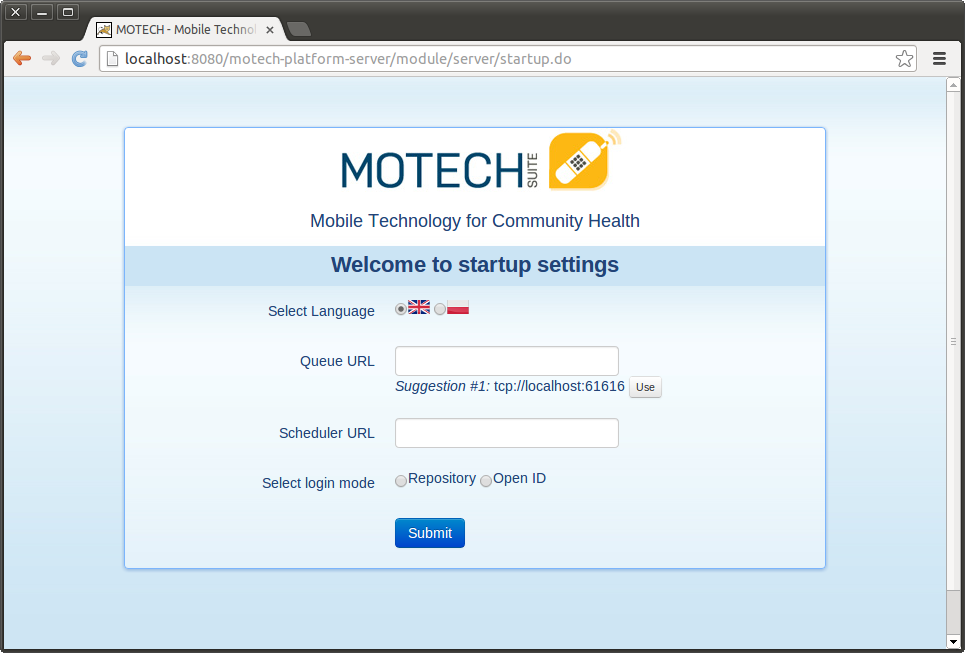
Note
The war file contains all modules required for starting and managing MOTECH. You can either use the Admin UI to install additional modules at runtime or place them in the
~/.motech/bundlesdirectory and restart MOTECH. Note that doing a mvn clean install on any of our modules will place that module in the~/.motech/bundlesdirectory automatically. Modules from that directory always override the ones contained in the war if their Bundle-Version and Bundle-SymbolicName are the same.
Installing the IDE, Intellij IDEA Community Edition & open MOTECH project
Go to the Jetbrains home page and click on Download Now in the Community Edition box, then expand the file to your home directory.
From a terminal, assuming you extracted IntelliJ to ~/idea-IC-143.2287.1, start IntelliJ
$ ~/idea-IC-143.2287.1/bin/idea.shSelect Import Project
Select ~/motech/pom.xml, a dialog box will appear. Set the options as shown:
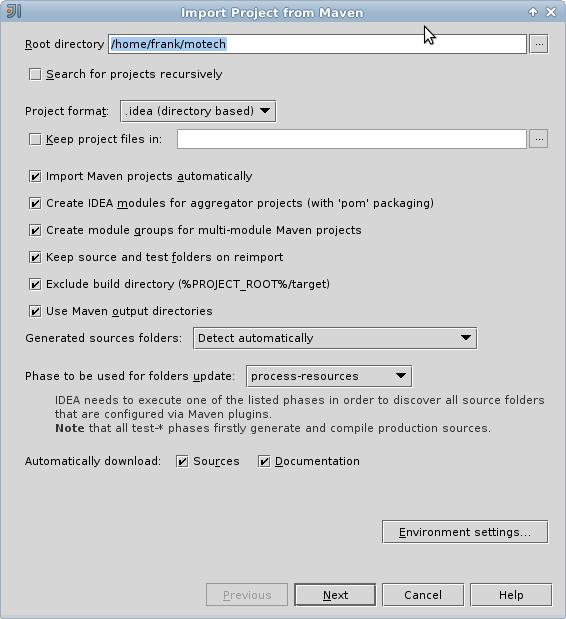
Click Next
In Select Profiles, do not select any profile, click Next
In Select Maven projects to Import, there should only be one project: org.motechproject:motech:0.30-SNAPSHOT, click Next
In Please select project SDK, if the 1.8.0_73 is present, select it, otherwise add it:
Click +
Select JDK
Select /home/YOURUSERNAME/jdk1.8.0_73, then click OK
Click Next
Click Finish
Background processes will take a long time
You can also create a menu launcher, so you can start IntelliJ from the gui:
From the Tools menu select Create Desktop Entry
A IntelliJ menu item will be created in the Development application group
Debug demo module in IntelliJ
Start IntelliJ (from the command line, or from launcher icon if you created one)
It’ll automatically open the motech project (if it was the last project you worked on)
From the Run menu select Edit Configurations
Click on the green +
Select Remote
Give a name to your Run/Debug configuration and change the port to 8000 as:
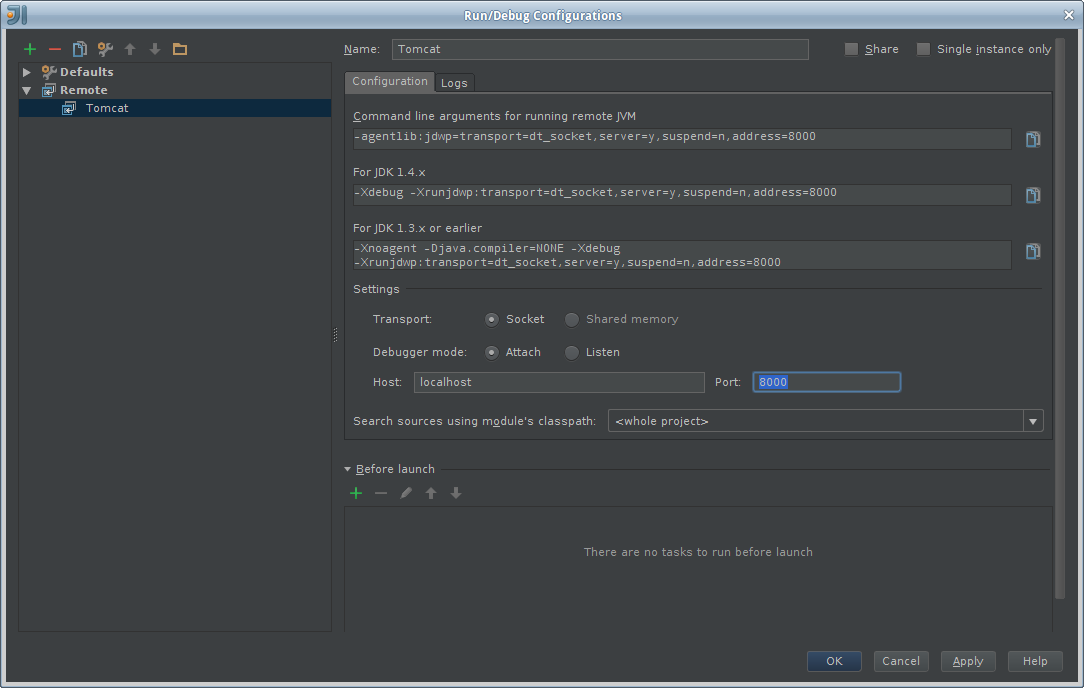
Hit OK
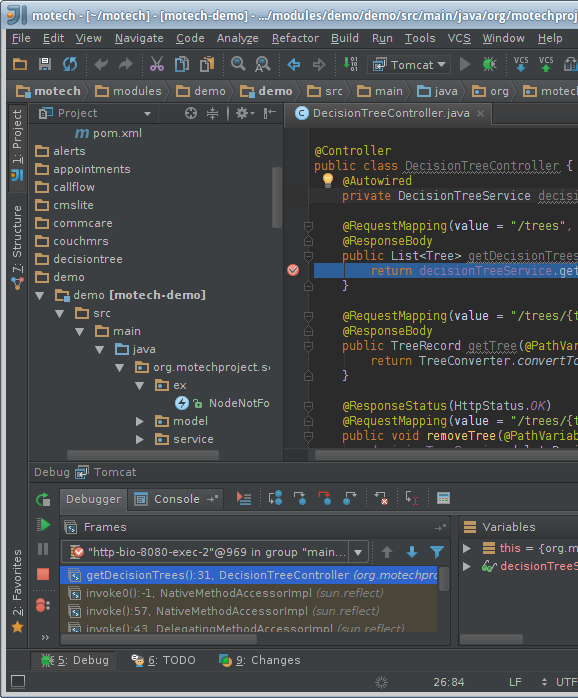
Set a breakpoint somewhere in the demo module code, i.e.:
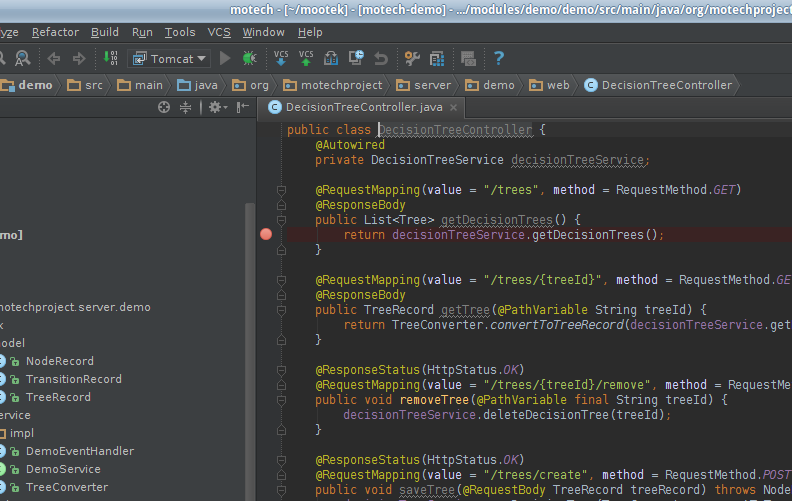
From the Run menu, select Debug ‘Tomcat’ where Tomcat is the name of your configuration.
In the browser go to the place that will hit the breakpoint, i.e.: if you setup a breakpoint as in the previous screen, then in the Demo module, click the Decision Trees tab, and you should hit the breakpoint!